- Interior & comfort
- Be the first to comment!
- Read 3980 times
Glove box lamp
A guide to fit a glove box lamp if not fitted as standard, helps locate things in the glove box at night!
Metros applicable for this how to guide
- Rover Metro K-series Mk3 (all models)
- Rover 100 K-series Mk4 (all models)
- Austin & MG Metro Mk2 (all models)
* = The wires should already be fitted just clipped behind the glove box somewhere.
Parts Required
- Glove box lamp
- Glove box switch
- Glove box wires*
- Glove box with lamp hole cut out
If removing the wires from a scrap car follow them all the way back to the blue connector as it makes it easier to refit if they have not been cut.
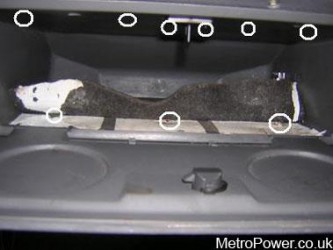
- Remove the existing glove box and swap with a box fitted with the lamp or cut the holes out on your existing one. Screws are circled the lower 3 may be below a carpet.

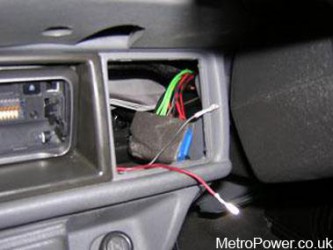
- Remove the Heater vents for access then slide your wires across to the blue connector, your power is located here.


- Clip your wires into the blue connector. Make sure you fit them in the right place e.g black with the black and red with the red. There are 6 outlets here and 3 are already used.
(This is a good place to get power if you want to have illuminated gauges as well)
- Push the blue connector back and refit the vents
- Connect the other wire ends to the switch and glove box lamp
- Refit the glove box. reversal of removal
- Test to see if it works (it will only work when the lights are on)


